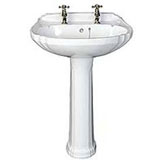
Shires Pedestal Basin
The pedestal basin is becoming more and more popular, as new homeowners have realized the value of maximizing the space they have in their homes. Though the basin is actually supported by the bathroom wall, it looks as though the pedestal is holding up the basin, giving it a look that can be both elegant and minimalistic.
The Benefits of Using a Pedestal Basin
The main trademark of the Shires pedestal basin is its appearance. Depending on the specific model you choose, you can add a touch of county charm, a taste of modern elegance, or the boldness of fashionable luxury to your modest-sized bathroom. These models not only make your small bathroom appear larger, but they are also very affordable.
The Shires pedestal basin is designed to conceal the pipes for the water supply and the drain. These drains do not contribute much to the attractiveness of a bathroom and traditionally, they are hidden by having a cabinet built beneath the basins. The pedestal basin, however, is hollow in the back so it can conceal the pipes easily.
Replacing the Water Supply Pipe
The cost of a pedestal basin pipe is almost negligible, so it would be better to just replace them in case of leaks.
- You will have to first turn off the water supply valves. If there are no valves at the water supply pipes, you'll have to cut the main water supply (you can usually find them near the water meter). Below the valves, you should place a towel for any leaking water once the valves are removed from the basin's water pipes. If there are valves, release the water pressure by loosening the valve nuts with a wrench. If, after a few moments, the water is still flowing, examine the valve to see if it has been completely turned off. Turn it on completely, and then turn it off again, as there may be some solid fragments in the valve when you turned it off.
- After releasing the water pressure, you may remove the valve nut by hand. You should only use a pipe wrench or pliers if your basin has rigid pipes. With rigid pipes, start disassembling them from the joint nearest to the bathroom floor or wall, and disconnect them until you reach the faucet.
- Trace your way up the water pipes to the base of the faucet. With the appropriate wrench, find and remove the nuts that connect the water pipes to the faucets. The new water pipes can now be installed.
- Wrap the threads of the new pipes with Teflon tape. Do this in a clockwise direction, so that it won't be removed when the nut is tightened.
Replacing the Drain Pipe
Find the P-trap beneath the basin, and put a bowl under it to catch the water when you loosen the trap. Loosen the nuts at the ends of the P-trap, and then pry the trap loose. Let the water into your bowl, and then remove the bowl and dispose of the water.
Find the nut that connects the drainpipe to the bottom of the basin, and remove it with your wrench or pliers. If the nut is made from PVC, do this by hand instead. For a better grip, wrap a piece of cloth around it. The wrench or the pipes may damage the nut, so don't use them. Then find the nut that connects the pipe to the P-trap, and remove it.
Starting at the basin, you can now replace the old drainpipes. Use the old pipes to measure the new ones, and see if some of them need to be cut to fit. You can use a hacksaw or something similar to cut a PVC pipe. Smoothen the cuts with sandpaper, so that the new connection will be free from leaks.

